


15 Creative DIY Hacks To Elevate Your IKEA Furniture On A Budget
- Mark MacDonald
- Aug 28, 2023
- 6 min read

Updated: Sep 13, 2023
This post shows you the best ways to improve your IKEA furniture.
Transforming your IKEA furniture into unique pieces that reflect your style has never been easier or more affordable. In this article, we've compiled 16 innovative DIY hacks that will not only enhance the aesthetic appeal of your IKEA finds but also help you create custom pieces that stand out. These hacks are designed to be simple, cost-effective, and perfect for beginners and seasoned DIY enthusiasts alike. Let's dive into the world of creative possibilities and elevate your home decor!
1. Rustic Revamp with Stenciled Details:
Give your plain IKEA dresser a charming farmhouse vibe by adding stenciled patterns to the drawer fronts. Begin by selecting a stencil design that resonates with your aesthetic and gather your materials: an IKEA dresser, chalk paint in rustic shades, stencil brushes, and adhesive stencils. Apply the stencil to each drawer, using a light touch with the brush to create a distressed look. This stenciled dresser makeover project will infuse a cozy feel into your space.
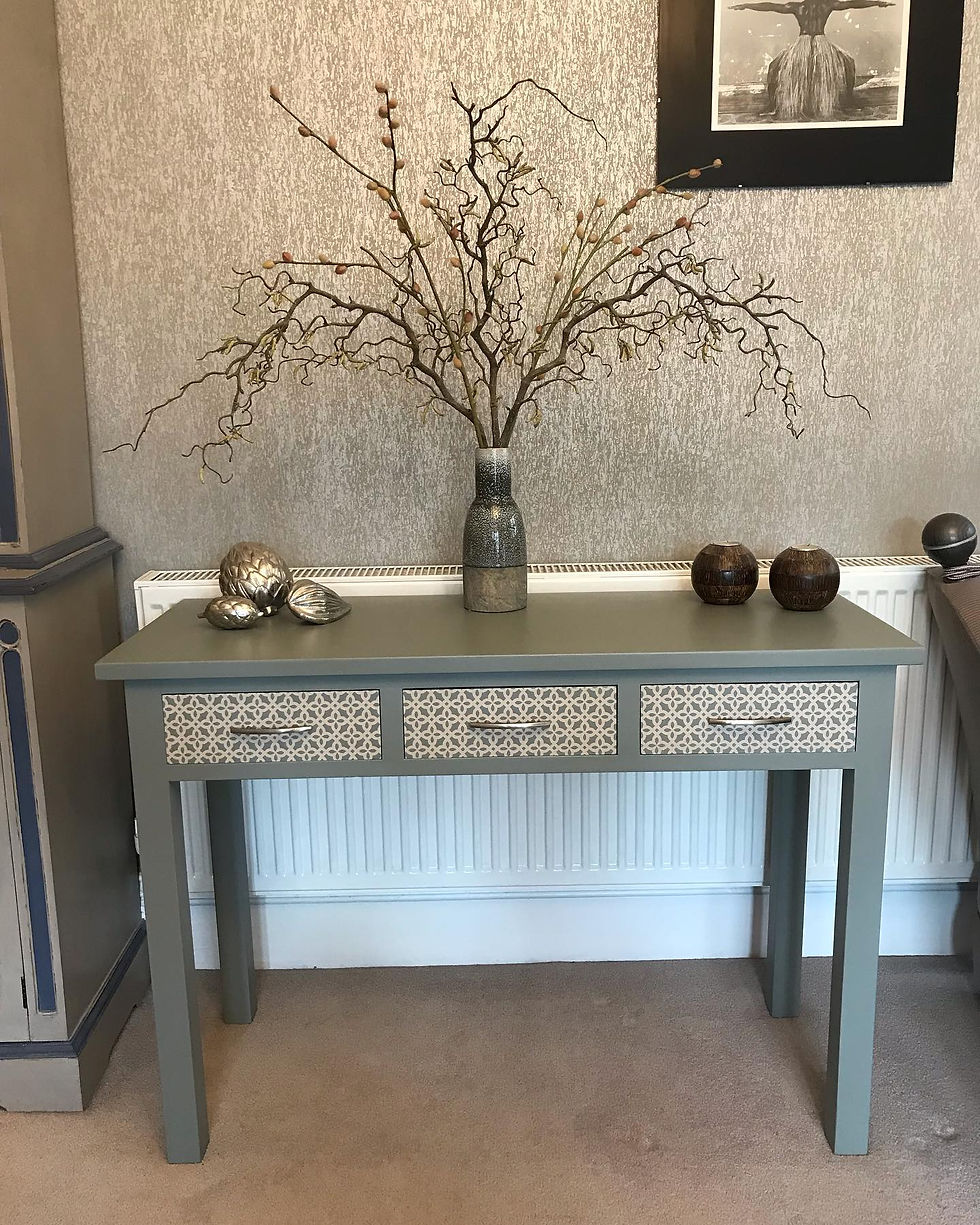
credit: @catkin_and_willow
2. Marble-Top Magic:
Upgrade your IKEA coffee table by introducing a touch of luxury with marble contact paper. For this project, you'll need an IKEA coffee table and marble contact paper. Measure the tabletop and cut the contact paper to size. Carefully peel off the backing and apply the paper, smoothing out any air bubbles as you go. The result? A stunning marble-inspired coffee table that instantly elevates the elegance of your living room, creating a sophisticated focal point.

credit: katerinteriors
3. Bold Color Block Bookshelves
Elevate your bookshelf from practical to eye-catching by embracing the bold color block trend. To start, choose your desired colors and gather an IKEA bookshelf, painter's tape, and paint in your chosen hues. Carefully tape off alternating sections on the bookshelf, and then paint each section with its corresponding color. Once the paint is dry, remove the tape to reveal your vibrant color block bookshelf masterpiece. These vibrant sections create an artistic display that not only stores your items but also serves as a striking design element.

credit: kparslowinteriors
4. Faux Leather Drawer Pulls
Add a touch of modern elegance to your IKEA cabinets by swapping out standard handles for faux leather straps. Gather your supplies: faux leather strips, brass hardware, screws, and an IKEA cabinet. Measure and cut the leather strips to your desired length, then attach the brass hardware to the strips. Finally, screw the new pulls onto your cabinet doors. This faux leather handles hack exudes sophistication and charm. The combination of faux leather and brass hardware creates a sense of refinement that elevates your cabinets.

credit: dowsingandreynolds
5. Mid-Century Modern Legs
Give your IKEA sofa or coffee table a mid-century modern twist with sleek tapered legs. To achieve this look, you'll need replacement legs with mounting plates, a screwdriver, and your chosen IKEA piece. Remove the existing legs, attach the new ones using the provided hardware, and voila! Your furniture now boasts that iconic mid-century furniture legs flair. These iconic legs instantly transport your furniture to a bygone era, adding a touch of timeless sophistication.

credit: californiamodernlife
6. Custom Fabric-Covered Chairs
Infuse personality into your dining area by reupholstering IKEA dining chairs with patterned fabric. Begin by selecting fabric that complements your decor. For this project, you'll need the fabric, a staple gun, scissors, and an IKEA dining chair. Remove the old seat cover, cut the fabric to size, and use the staple gun to attach it securely. This dining chair reupholstery project ensures your chairs align with your style. The custom fabric adds a pop of colour and pattern, transforming your dining space into a unique and inviting environment.

credit: diamond_upholstery
7. Decoupage Delight
Transform plain IKEA storage boxes into captivating works of art using the decoupage technique. Collect your supplies: IKEA storage boxes, mod podge, brushes, and your chosen decorative paper or images. Apply a layer of mod podge to the box, carefully lay the paper on top, and smooth out any wrinkles. Seal with another layer of mod podge, and repeat for the entire box. This decoupage decoration idea lets your creativity shine. The personalised designs and patterns on your storage solutions make them not only functional but also visually pleasing.

credit: thegrandsonsbrush
8. Copper Accents for Side Tables
Infuse the allure of metallics into your decor by spray-painting IKEA side table legs with copper finish. Gather your supplies: copper spray paint, sandpaper, painter's tape, and an IKEA side table. Sand the legs lightly to create a smooth surface, tape off any areas you don't want painted, and then apply the spray paint. The result is a chic copper table legs transformation that adds a touch of glamour to your space. The rich copper accents create a sense of opulence, elevating your side tables to chic and glamorous pieces.

creddit: grahamandgreenoutlet
9. Ombre Dresser Drawers
Elevate your IKEA dresser with a stunning ombre gradient on its drawers. Start by selecting your desired paint colors, then gather an IKEA dresser, sandpaper, paintbrushes, and paint in the chosen shades. Begin with the lightest color at the top drawer and gradually transition to the darkest shade at the bottom. Blend the colors for a seamless gradient effect, creating a captivating ombre drawer painting visual. The gradual transition of colors adds depth and visual interest, turning your dresser into a attention grabbing centerpiece.

credit: furniture_reloved
10. Washi Tape Embellishments
Add a playful touch to your IKEA mirror or picture frames with vibrant washi tape patterns. Select tapes that match your decor and gather an IKEA mirror or frame, and your chosen washi tapes. Apply the tapes in creative patterns directly onto the mirror frame or along the edges of the frame. This washi tape craft hack allows you to experiment with designs that reflect your personality. The whimsical designs bring a lighthearted and artistic element to your decor, elevating your space with creativity.

credit: fabiennemorel_studio
11. Minimalist Floating Nightstand
Maximize space and style with a minimalist floating nightstand crafted from an IKEA shelf and brackets. For this project, you'll need an IKEA shelf, brackets, a drill, wall anchors, and screws. Install the brackets securely on the wall, ensuring they can support the shelf's weight. Attach the shelf to the brackets, and you've created a functional floating nightstand DIY addition to your bedroom. The floating design creates a sense of openness, adding an understated yet impactful element to your bedroom.

credit: woodwaves
12. Chalkboard Cabinet Doors
Turn your IKEA cabinet doors into versatile chalkboards with chalkboard paint. Gather your materials: chalkboard paint, paintbrushes, masking tape, and an IKEA cabinet. Remove the doors and place them on a protected surface. Use masking tape to create clean edges, then apply the chalkboard paint. Once dry, reattach the doors for functional and stylish chalkboard cabinet flair. The functional aspect of jotting down notes or doodles adds an interactive element to your furniture, elevating its usefulness.

credit: pipandkaboodle
13. Vintage Knob Upgrade
Elevate your IKEA furniture's look by replacing standard knobs with charming vintage alternatives. For this hack, gather an assortment of vintage knobs, a screwdriver, and your chosen IKEA furniture piece. Remove the existing knobs, and then attach the vintage ones using the provided screws. This decorative knob replacement project adds character and style to your furniture. The unique knobs infuse character and a sense of nostalgia into your furniture, transforming it into a conversation piece.

credit: woodoobudapest
14. Hemp Rope Accents
Introduce a touch of natural texture by wrapping and gluing hemp rope around table legs or chair frames. Collect your supplies: natural hemp rope, hot glue gun, and an IKEA table or chair. Start at the top and apply hot glue as you wrap the rope around the legs or frame. Secure the end with a final dab of glue. This rope-wrapped furniture hack brings rustic elegance to your space. The tactile quality of the rope adds depth and interest, elevating your furniture with a rustic yet refined charm.

credit: 7thelement.ie
15. Hexagon Patterned Headboard
Craft an artistic headboard using IKEA hexagon-shaped mirrors to create a captivating geometric pattern above your bed. Gather the mirrors, adhesive wall mounts, and a tape measure. Plan your arrangement and mark the positions for each mirror. Attach the mirrors securely to the wall, following your design. This hexagon mirror headboard adds a layer of dimension to your room and can exponentially make your bedroom feel larger whilst creating an intriguing focal point to the room.

credit: classic.frames
With these 16 imaginative and budget-conscious DIY hacks, you have the power to transform your IKEA furniture into extraordinary pieces that define your space. Whether you're drawn to rustic charm, modern elegance, or playful aesthetics, these hacks empower you to express your personality through your home decor. Embrace your inner DIY enthusiast and embark on a journey of creativity and transformation!


Comments